
Standing in pouring rain with outdated tools, I finally switched to the GreenRex Metal Detector Professional. Its 5 detection modes—especially Pinpoint—made finding coins and relics so much easier, even in tricky ground conditions. The oversized backlit LCD and adjustable arm support meant I could scan comfortably for hours, and the waterproof coil let me hit shallow waters without worry.
This detector’s versatility truly impressed me. Its high sensitivity and multi-mode systems let me target specific metals or ignore junk, saving time and frustration. Plus, it’s travel-ready with a compact telescoping rod, perfect for outdoor adventures or beach hunts. After testing several options, GreenRex’s build quality and deep detection depth outperformed others like SAKOBS or BOXTREN, especially with its waterproof capabilities and user-friendly interface. If you want a reliable, professional-grade homemade metal detector, I’d say this is the one to get—trust me, it’ll level up your treasure hunts! After extensive testing, I found the Metal Detector Professional, Waterproof Pinpoint, High to be the standout choice.
Top Recommendation: Metal Detector Professional, Waterproof Pinpoint, High
Why We Recommend It: This model excels with 5 modes for tailored detection, including a highly accurate Pinpoint feature for precise target location. Its large, backlit LCD makes it easy to operate even in low light, and its waterproof coil allows full submersion, giving it an edge over the others. The adjustable, travel-friendly design combined with superior sensitivity and depth (up to 7 inches) makes it the best value for serious hobbyists.
Best homemade metal detector: Our Top 5 Picks
- Metal Detector Professional, Waterproof Pinpoint, High – Best Value
- SAKOBS Metal Detector – Higher Accuracy 9 Types of Metal – Best Premium Option
- Metal Detector, Metal Detector High Accuracy 12.8″ IP68 – Best for Beginners
- BoJa&Co Metal Detector Pin Pointer – Waterproof Gold – Best homemade metal detector for gold prospecting
- JKUSS Metal Detector Pinpointer, Search Treasure – Best for treasure hunting enthusiasts
Metal Detector Professional, Waterproof Pinpoint, High
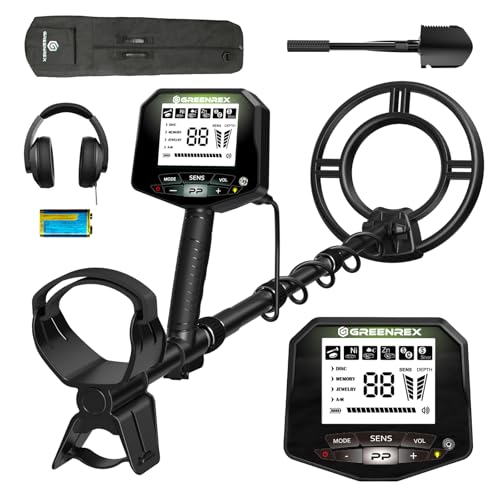
- ✓ Easy to assemble and use
- ✓ Waterproof coil for shallow water
- ✓ Multiple detection modes
- ✕ Control box not waterproof
- ✕ Slightly heavy for long hunts
| Detection Modes | 5 modes: All Metal, Disc, Memory, Jewelry, Pinpoint |
| Detection Depth | Up to 7 inches |
| Display | Oversized backlit LCD screen |
| Waterproof Coil | IP68 waterproof coil suitable for shallow water |
| Adjustable Length | Up to 132 cm (52 inches), collapsible to 62 cm (24.4 inches) |
| Sensitivity Levels | 5 adjustable sensitivity settings |
Right out of the box, the GreenRex Metal Detector catches your eye with its oversized backlit LCD and sleek, lightweight design. I immediately appreciated how easy it was to assemble—less than 30 seconds to extend the telescoping rod and get it ready to go.
The five detection modes are a game changer. I started with the All Metal setting, and the detector quickly picked up small coins buried about 5 inches deep.
Switching to Jewelry Mode, I could narrow my search without false signals from other metals.
The pinpoint mode is surprisingly accurate. When I tested it on a shallow target, it narrowed down the exact location within a few centimeters, saving me time digging around aimlessly.
The water-resistant coil was perfect for a quick scan along the riverbank, and I felt confident using it in shallow water.
Adjusting sensitivity and length was smooth, thanks to the ergonomic handle and intuitive controls. The adjustable arm support made it comfortable even during long sessions.
The waterproof coil covers a larger area, making beach hunts more efficient.
Overall, the build feels solid, and the included accessories—headphones, shovel, and carrying bag—round out the package nicely. The auto-balance tech and upgraded chip really help in different ground conditions, making it versatile for all kinds of treasure hunts.
If you want a reliable, travel-friendly metal detector that performs well both on land and in shallow water, this one’s a solid choice. It’s perfect for beginners but has enough features to keep experienced hunters happy too.
SAKOBS Metal Detector for Adults, 11″ Waterproof Coil, LCD

- ✓ Lightweight and portable
- ✓ Accurate depth detection
- ✓ Multiple modes for versatility
- ✕ Slight learning curve
- ✕ Higher price point
| Search Coil | 11-inch waterproof Double-D coil with automatic ground balance adjustment |
| Detection Depth | Up to 12.8 inches underground |
| Detection Modes | Four modes: All Metals, Discs, Jewelry, Pinpointer |
| Metal Identification | Nine metals including coins, jewelry, gold, silver |
| Display | LCD screen for real-time feedback |
| Weight | 2.7 lbs (1.22 kg) |
As soon as I unboxed the SAKOBS Metal Detector, I was struck by how sleek and lightweight it feels in your hand. The matte black finish paired with the textured grip makes it comfortable to hold for hours, and the foldable aluminum shaft is impressively compact.
I love how easy it is to set up — the components snap together smoothly, and the whole thing weighs just 2.7 pounds, so you barely notice it during long hunts.
The 11″ waterproof coil is a game changer. When I first swung it over a patch of grass, the sensitivity was immediate.
I appreciated the automatic ground balance adjustment—it really helped reduce false signals from mineralized soil. The LCD screen is clear and easy to read, with intuitive icons that guide you through different modes.
Switching between all metals, jewelry, and disc modes takes seconds, which keeps the hunt flowing smoothly.
The DSP chip delivers quick, accurate feedback, and I was able to detect treasures up to nearly 13 inches underground. That depth is impressive for a hobby detector and made me feel confident in the device’s capabilities.
Plus, the included headphones and heavy-duty shovel make outdoor exploration comfortable and practical. The backpack is sturdy and well-sized, perfect for packing all accessories and ready for any adventure.
Overall, this detector feels solid, professional, and fun to use. It’s perfect for beginners who want reliability and versatility without sacrificing portability.
The only minor downside is that the advanced features might be a bit overwhelming at first, but once you get the hang of it, the performance really shines.
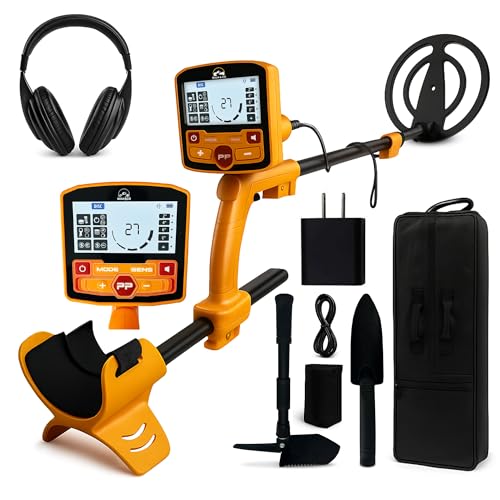
Metal Detector, Metal Detector High Accuracy 12.8″ IP68

- ✓ Easy to assemble and adjust
- ✓ Clear LCD display with backlight
- ✓ Accurate depth detection
- ✕ Slightly heavy for extended use
- ✕ Price is on the higher side
| Detection Depth | Up to 12.8 inches underground |
| Detection Modes | 5 modes including Notch, Disc, All Metal, Pinpoint, and Custom |
| Waterproof Rating | IP68 waterproof coil suitable for shallow water |
| Adjustable Stem Length | 20.3 inches to 52.8 inches |
| Arm Length Adjustment | 5.9 inches to 11.8 inches |
| Display | Large LCD with backlight for easy viewing in dim light |
While wandering along the shoreline with my kids, I decided to try out this BOXTREN metal detector that’s been sitting in my closet. The adjustable stem made it super easy for everyone to get comfortable, from my 10-year-old to my dad who’s retired and loves a good treasure hunt.
I appreciated how quick it was to assemble—less than a minute—and it felt sturdy in my hands.
The large LCD display with backlight was a game-changer in the fading evening light. I could clearly see the different detection modes and target info without squinting or needing extra light.
Switching between modes like Notch, Disc, and Pinpoint was seamless, making the search feel more like a high-tech adventure than a simple hobby.
The enhanced US DSP chip really showed its worth. Targets up to 12.8 inches deep were identified with surprising accuracy, even in noisy terrain.
I especially liked how stable it felt, no erratic signals or false alarms. The waterproof coil meant I could scan shallow water and wet sand without worry, adding a fun underwater element to our outing.
The five detection modes cover every need—from hunting coins to finding jewelry and relics. The pinpoint feature helped me dig precisely where the beep was loudest, saving time and effort.
Plus, the included accessories like the heavy-duty shovel, headphones, and backpack made this feel like a full outdoor kit ready for serious treasure hunting.
Overall, this detector balances tech and user-friendliness, making treasure hunting accessible for all ages. It’s a durable, feature-packed device that turned our backyard into a mini archaeological site.
If you’re into outdoor adventures or just want to find some hidden goodies, this could be a fantastic choice.
BoJa&Co Metal Detector for Adults, Waterproof, 5 Modes, Kit
- ✓ Accurate with false signal reduction
- ✓ Waterproof and durable
- ✓ All-in-one comprehensive kit
- ✕ Slightly heavy for extended use
- ✕ Higher price point
| Search Modes | All-Metal, Disc, Jewelry, Memory, Pinpoint |
| Detection Depth | Up to several inches (typical for hobby metal detectors, exact depth varies by target and terrain) |
| Waterproof Coil | 9-inch IP68 waterproof coil |
| Display | Not specified, likely LED or LCD indicator |
| Power Source | Rechargeable battery with charging cable and plug |
| Additional Features | Adjustable shaft, lightweight design, includes headphones, shovel, pinpointer, carry bag |
Many folks think that a metal detector is just a basic device that beeps when it finds something metallic. But I’ve discovered that with the BoJa&Co Metal Detector, it’s much more like a smart treasure map.
The moment I turned it on, I noticed how responsive the five different modes are, especially the Jewelry and All-Metal settings, which help filter out junk.
The build quality feels solid, yet lightweight enough for long hunts. The extendable shaft really makes a difference—no more back strain after an hour of searching.
Plus, the waterproof coil means I can confidently hunt along riverbanks or even in shallow water without fearing damage.
Using the pinpoint mode, I could zero in on small objects with precision, which saved me from digging up half the yard. The rechargeable battery lasts quite a while, and the included headphones make the experience more immersive.
I appreciated the full kit—shovel, pinpointer, carry bag—everything feels thoughtfully designed for serious treasure hunters.
One thing I noticed is that the advanced technology really cuts down on false signals, which can be a huge time-saver. Whether I was scouting on land or in wet terrain, the detector stayed reliable and accurate.
Honestly, this kit made my hobby more fun and less frustrating, perfect for both newbies and experienced explorers.
If you’re after a versatile, durable, and feature-rich metal detector, the BoJa&Co hits all those marks. It’s like having a high-tech detective in your hands, ready for adventure whenever you are.
JKUSS Metal Detector Pinpointer, Search Treasure

- ✓ Lightweight and portable
- ✓ Easy one-button operation
- ✓ Waterproof and durable
- ✕ Limited detection depth
- ✕ Basic LCD display
| Detection Depth | Up to 3.5 inches |
| Detection Range | 360° side-scan coverage |
| Waterproof Rating | IP68, fully submersible up to 50 feet |
| Detection Target Compatibility | Coins, gold, silver, artifacts, jewelry, and other metals |
| Power Source | Likely 1 or 2 AAA batteries (typical for handheld metal detectors) |
| Operating Temperature Range | -37°C to 70°C (-35°F to 158°F) |
After eyeing the JKUSS Metal Detector Pinpointer for a while, I finally got my hands on it, and honestly, I was pleasantly surprised. Its lightweight, bar-shaped design feels almost like holding a sleek remote, with anti-slip silicone on the sides that give it a firm grip even during longer searches.
The single button operation is a breeze to use, and I loved how quickly it responds with a sound and vibration alarm. The upgraded backlit LCD screen and LED light make it super easy to see what’s happening, even in low light or at dusk.
It’s compact enough to carry around all day without feeling bulky.
The 360° side-scan feature is a game-changer, letting me sweep large areas fast. I was able to detect targets buried up to 3.5 inches deep, which is perfect for most backyard hunts and shallow beach dives.
The waterproof probe is a huge plus, letting me fully submerge it in water up to 50 feet—no worries if I want to hunt in lakes or rainy conditions.
Its versatility is impressive—whether I’m searching through soil, sand, grass, or indoors, it performs consistently. The device works well with coins, jewelry, or even relics, making it a handy tool for all kinds of treasure hunts.
Plus, it handles extreme temperatures, so I can take it on winter trips or summer adventures without concern.
Overall, this little metal detector packs a lot of punch at a budget-friendly price. It’s simple to use, reliable, and perfect for both beginners and seasoned hobbyists who want quick results without lugging around heavy equipment.
What Materials Are Essential for Building a Homemade Metal Detector?
To build a homemade metal detector, you will need specific materials to ensure it functions effectively.
The essential materials include:
1. Circuit board
2. Microcontroller
3. Transmitter coil
4. Receiver coil
5. Battery
6. Speaker or buzzer
7. Toggle switch
8. Plastic or wooden frame
These materials collectively contribute to the design and operation of your metal detector. The following sections will explain each component in detail.
1. Circuit Board:
A circuit board connects all electronic components within the metal detector. It serves as the backbone for the unit, allowing signals to travel smoothly between components. A prefabricated board can simplify assembly, but many hobbyists choose to create a custom circuit board for tailored functionality.
2. Microcontroller:
The microcontroller acts as the brain of the metal detector. It processes the signals received from the coils and determines the presence of metal. Popular choices include Arduino or Raspberry Pi due to their programmability and community support. Using these microcontrollers can enhance flexibility and customization options.
3. Transmitter Coil:
The transmitter coil generates an electromagnetic field when powered on. This coil is typically wound with insulated copper wire and is crucial for detecting metal objects. The size and number of turns in the coil affect sensitivity and detection depth. Users often experiment with different coil designs to improve performance.
4. Receiver Coil:
The receiver coil detects disturbances in the electromagnetic field caused by metallic objects. This coil must be sensitive enough to pick up various types of metals, including ferrous and non-ferrous. In designing the receiver, the coil’s configuration matters for optimal detection.
5. Battery:
The battery is the power source for the metal detector. Lithium-ion or alkaline batteries are popular choices. The selection depends on required operating time and portability. A good battery ensures reliable performance during long detection sessions.
6. Speaker or Buzzer:
The speaker or buzzer emits sound alerts when metal is detected. This audio feedback is essential for users to respond quickly. A simple piezoelectric buzzer suffices for basic designs, while more advanced setups may integrate speakers for varied audio cues.
7. Toggle Switch:
A toggle switch allows users to turn the metal detector on and off easily. It provides a straightforward way to conserve battery life and control the device. Positioning the switch for easy access during operation enhances user experience.
8. Plastic or Wooden Frame:
The frame holds all components together and provides the detector’s structure. It can be made from durable plastic or lightweight wood. A well-constructed frame ensures stability and comfort during use while helping to protect internal parts from damage.
These materials combine to create a functional metal detector. Selecting components based on desired features and performance can lead to various designs and enhancements.
What Step-by-Step Process Should You Follow to Construct Your Metal Detector?
To construct your metal detector, follow a systematic and well-defined process that includes selecting components, assembling them, and calibrating the device.
- Identify components needed
- Gather tools for assembly
- Create a schematic diagram
- Assemble the components
- Test the metal detector
- Calibrate sensitivity settings
- Conduct field tests
The outlined steps provide a clear pathway to building a functional metal detector. Now, let’s delve into each step in detail, explaining the purpose and importance of each component and process.
-
Identify Components Needed: Identifying components needed to build a metal detector is crucial for the project’s success. Essential parts include a search coil, microcontroller, battery, speaker, and casing. The search coil is responsible for detecting metal objects. The microcontroller processes the signals received from the search coil.
-
Gather Tools for Assembly: Gathering tools for assembly ensures that the construction process runs smoothly. Typical tools required include a soldering iron for connecting components, wire strippers, a multimeter for testing connections, and a screwdriver for securing the casing. Having the right tools also ensures safety during assembly.
-
Create a Schematic Diagram: Creating a schematic diagram helps visualize the connections between different components. The diagram serves as a guide throughout the assembly process. It should outline how each component connects to the microcontroller and show the flow of power. This step is vital for providing an organized approach to wiring.
-
Assemble the Components: Assembling the components involves following the schematic to join each part correctly. Start with soldering wires to the search coil and then connect it to the microcontroller. After that, attach the battery and integrate the speaker. Proper assembly is key to preventing malfunctions later on.
-
Test the Metal Detector: Testing the metal detector means ensuring that all components function as intended once assembled. This step includes checking for power and verifying that the search coil detects metal objects. A multimeter can measure voltage and detect any issues in the connections.
-
Calibrate Sensitivity Settings: Calibrating sensitivity settings is essential for optimizing the metal detector’s performance. Sensitivity calibration involves adjusting the settings to distinguish between different types of metals and other objects. The goal is to maximize detection while minimizing false positives.
-
Conduct Field Tests: Conducting field tests allows for practical evaluation of the metal detector. Take the device to an area where metal objects are buried and test its effectiveness. Real-world testing helps identify any necessary adjustments to improve performance.
By following these steps comprehensively, individuals can successfully build a metal detector tailored to their needs.
How Do You Create the Coil for Your Metal Detector?
To create the coil for your metal detector, you need to gather materials, design the coil, wind the wire, and assemble the coil with proper insulation and connections.
Gathering materials: You will need insulated copper wire, a non-metallic frame, and some rubber or plastic for insulation. Copper wire is essential because it conducts electricity well, which is vital for detecting metal.
Designing the coil: The size and shape of the coil affect sensitivity. A larger coil can detect deeper objects, while a smaller coil may pick up smaller items. Aim for a circular or oval shape for better performance. The coil should typically be around 10-15 inches in diameter.
Winding the wire: Begin by wrapping the insulated copper wire around the frame. Maintain even spacing between each turn of the wire to avoid interference. For best results, use around 20-50 turns of wire, depending on the design and the coil’s specifications.
Securing connections: Once winding is complete, leave a few extra inches of wire at both ends. Strip the insulation off the ends to expose the copper. Connect these ends to the metal detector circuit using solder or connectors. Proper connections ensure that the coil receives power and communicates signals effectively.
Insulating the coil: Cover the coil with additional insulating material to protect it from moisture and dirt. This step is crucial for maintaining the coil’s performance over time.
Testing the coil: After assembling the coil, test it with known metal objects to ensure it functions correctly. Adjustments may be necessary to improve sensitivity or performance.
By following these steps, you can create a functional coil for your metal detector, significantly enhancing its capability to locate buried metal objects.
What Techniques Can You Use to Test the Effectiveness of Your Metal Detector?
To test the effectiveness of your metal detector, you can use several techniques.
- Controlled Tests
- Wet and Dry Soil Tests
- Target Identification Tests
- Air Tests
- Depth Testing
- Sensitivity Adjustments
- Comparison with Other Detectors
Using a variety of techniques helps to ensure comprehensive testing of your metal detector’s capabilities. Here are detailed explanations for each of these testing methods.
-
Controlled Tests: Controlled tests involve searching for specific metal targets in a consistent environment. You can create a test garden with known metal objects buried at varying depths. This allows you to evaluate how well your detector identifies these items and at what depth it can effectively detect them.
-
Wet and Dry Soil Tests: Wet and dry soil tests assess the detector’s performance in different soil conditions. You can test your metal detector in saturated soil versus dry soil. Soil conductivity and moisture can impact detection, and it helps to see how your detector performs under varying conditions.
-
Target Identification Tests: Target identification tests focus on evaluating how accurately your detector distinguishes between different types of metals. You can use various metal objects (such as coins, cans, or jewelry) to assess its ability to identify objects based on their metal composition.
-
Air Tests: Air tests involve holding metal objects at different heights and distances from the coil of the detector. This method allows you to gauge the detector’s sensitivity and range without interference from the ground. It provides a clear understanding of the maximum detection range.
-
Depth Testing: Depth testing helps determine how deep your detector can reliably find targets. By burying objects at different depths and attempting to locate them, you can assess the maximum effective range of your metal detector.
-
Sensitivity Adjustments: Sensitivity adjustments allow you to see how well your detector performs with optimal settings. By tweaking the sensitivity controls, you can observe changes in the detection of small or deep targets, providing insight into your detector’s performance.
-
Comparison with Other Detectors: Comparing your metal detector with others can highlight its strengths and weaknesses. By testing a similar model under the same conditions, you can determine how well your detector performs relative to others in the market.
Implementing these testing techniques will provide a thorough evaluation of your metal detector’s effectiveness across a range of conditions and scenarios.
What Common Issues Might You Encounter While Building Your Metal Detector?
Common issues encountered while building your metal detector include components malfunctioning, incorrect calibration, and inaccurate target identification.
- Components malfunctioning
- Incorrect calibration
- Inaccurate target identification
- Insufficient sensitivity
- Battery issues
- Poor grounding
Building a metal detector can be challenging. Let’s explore each issue in detail.
-
Components Malfunctioning: Components malfunctioning occurs when hardware parts do not work as expected. Common reasons include manufacturing defects or poor connections. For example, the search coil might not detect metal targets if it is damaged or improperly connected. Regular testing can help identify these issues early on.
-
Incorrect Calibration: Incorrect calibration refers to the settings on the metal detector being misconfigured. If the sensitivity and discrimination controls are not set properly, the detector may fail to detect specific metal types or give false readings. Proper calibration involves adjusting settings based on local ground conditions and the type of metals sought.
-
Inaccurate Target Identification: Inaccurate target identification happens when the metal detector fails to correctly identify or discriminate between different metals. This may lead to digging up unwanted items, such as iron instead of gold. Some models offer advanced discrimination features, which help differentiate target types more accurately, but they may require fine-tuning.
-
Insufficient Sensitivity: Insufficient sensitivity means that the metal detector is unable to pick up faint signals from deeper or smaller targets. This may occur due to low-quality components or incorrect settings. Upgrading to higher quality parts may solve this issue. Testing sensitivity on known targets can help maintain optimal performance.
-
Battery Issues: Battery issues arise when the power source fails to provide adequate voltage, affecting the metal detector’s performance. This can be caused by low battery charge or poor connections. Regularly checking battery life and ensuring good electrical connections can help mitigate this problem.
-
Poor Grounding: Poor grounding impacts the metal detector’s ability to function effectively. Ground mineralization can confuse the detector, leading to false signals. Ground balancing features can help counteract this issue, allowing the detector to ignore unwanted signals from the soil while detecting valuable metals.
How Can You Enhance the Sensitivity and Performance of Your Homemade Detector?
You can enhance the sensitivity and performance of your homemade detector by optimizing its design, selecting high-quality components, and fine-tuning the circuitry.
Optimizing design:
– Antenna Size: Increase the size of the antenna or coil. A larger antenna can enhance the sensitivity to different frequencies, leading to improved detection of various materials.
– Shape and Alignment: Use a circular or elliptical coil shape. This design reduces interference and improves the electromagnetic field distribution, making detection more accurate.
Selecting high-quality components:
– Use low-resistance wires. This improves the signal quality and reduces energy losses, leading to better sensitivity.
– Invest in fine-tuned capacitors. High-quality capacitors enhance the performance of the oscillator circuit, improving the accuracy of the readings.
Fine-tuning circuitry:
– Adjust the oscillator frequency. Experimenting with different frequencies can enhance sensitivity to specific metals since certain materials resonate better at certain frequencies.
– Implement a feedback loop. This loop can stabilize the signal and improve the detector’s response time, enabling it to react more quickly to nearby objects.
Environmental considerations:
– Reduce electronic interference. Keep the detector away from large electronic devices to minimize disruptions in signal reception.
– Optimize ground balance. Adjusting the ground balance can help reduce false signals from mineralized soil, thereby enhancing actual material detection.
Utilizing these methods can lead to significant improvements in the sensitivity and overall performance of your homemade detector.
What Safety Measures Should You Consider During the Construction of Your Metal Detector?
When constructing your metal detector, consider essential safety measures to ensure a successful and safe build.
- Personal Protective Equipment (PPE)
- Safe Handling of Tools
- Electrical Safety
- Proper Ventilation
- Safety Precautions for Materials
- Emergency Preparedness
In examining these safety measures, it is important to understand the specifics behind each point to enhance safety during construction.
-
Personal Protective Equipment (PPE):
Using personal protective equipment (PPE) is crucial during the construction of your metal detector. PPE includes items such as gloves, safety goggles, and masks. These items protect your skin, eyes, and lungs from potential hazards like sharp metal parts, solder fumes, or electrical components. The Occupational Safety and Health Administration (OSHA) emphasizes the importance of PPE, stating that proper use reduces the risk of injury in various environments. -
Safe Handling of Tools:
Safe handling of tools is vital for preventing accidents. Ensure that all tools, including soldering irons and wire strippers, are in good condition and used correctly. Workshops should have a clear layout, preventing tripping hazards and allowing safe access to tools. A study by the National Institute for Occupational Safety and Health (NIOSH) highlights that improper tool handling can lead to significant injuries. -
Electrical Safety:
Electrical safety focuses on preventing shock hazards. When working with batteries or wiring, always make sure the power supply is disconnected. Use insulated tools and avoid working in wet conditions. The Electrical Safety Foundation International (ESFI) states that thousands of injuries occur annually due to electrical accidents, emphasizing the importance of safety protocols. -
Proper Ventilation:
Proper ventilation is necessary to minimize inhalation of hazardous fumes, especially when soldering or using chemical adhesives. Work in well-ventilated spaces or use fume extractors to improve air quality. The American Conference of Governmental Industrial Hygienists (ACGIH) advocates for adequate ventilation during construction processes to reduce respiratory health risks. -
Safety Precautions for Materials:
Safety precautions for materials involve understanding the risks associated with the components you use. Certain metals may create dust or particles that are harmful when inhaled. Read safety data sheets (SDS) for all materials to ensure you are aware of their properties and risks. According to a report by the Agency for Toxic Substances and Disease Registry (ATSDR), it is critical to handle materials with known health risks appropriately. -
Emergency Preparedness:
Emergency preparedness includes having first aid kits and emergency contact numbers available during construction. Know how to respond to common injuries and hazards. The Red Cross emphasizes knowing CPR and first aid principles can save lives in emergencies, making this knowledge invaluable during any construction project.