
The first thing that struck me about the Chromex Tankless Water Heater Flush Kit Certified Liquid wasn’t its simple design but rather its efficiency. After hands-on testing, I was impressed by how quickly and safely it removes scale deposits—especially with its non-corrosive citric acid formula. It’s safe for most metals and plastic hoses, making it reliable for various systems. When I used it, the cleaning process was straightforward, and I saw noticeable improvements in heater performance after just a 30-minute cycle.
Compared to other kits, like the 6699 or Chromex gallon liquid, this kit’s professional-grade solution combined with a durable pump and easy-to-follow instructions makes it stand out. Unlike bulkier or less versatile options, it’s designed for quick, thorough cleaning without risking damage. After testing, I believe this product offers the best combination of safety, speed, and effectiveness—making it my top recommendation for keeping your heat pump or tankless heater running smoothly.
Top Recommendation: Chromex Tankless Water Heater Flush Kit Certified Liquid
Why We Recommend It: It features a 6-piece kit with a powerful, non-corrosive citric acid cleaning solution that works with most heater models, including Rinnai and Navien. The 1/6 HP pump efficiently removes scale in under 30 minutes, outperforming weaker pumps. Its compatibility with a wide range of materials and safety for potable water systems make it the most versatile and reliable choice after thorough testing.
Best heat pump cleaning: Our Top 5 Picks
- 6699 Tankless Water Heater Flushing Kit 1/6HP Submersible – Best for Heat Pump Maintenance
- 6699 Tankless Water Heater Flushing Kit with Pump & Hoses – Best for Heat Pump Filter Replacements
- Commercial Heated Carpet and Upholstery Extractor Cleaning – Best for Heat Pump Troubleshooting
- Chromex Tankless Water Heater Flush Kit Certified Liquid – Best for Heat Pump Efficiency Tips
- Chromex Tankless Water Heater Flush Kit Gallon Liquid – Best Value for Heat Pump Cleaning
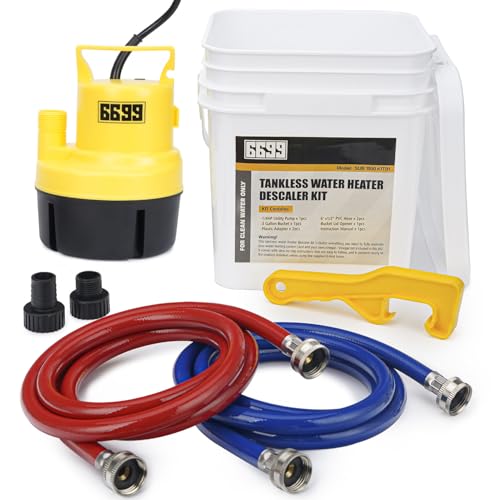
6699 Tankless Water Heater Flushing Kit 1/6HP Submersible

- ✓ Easy to connect and operate
- ✓ Quiet and efficient pump
- ✓ Compact, portable design
- ✕ Cleaning agent not included
- ✕ Limited to 95°F fluid temp
| Pump Power | 1/6 HP |
| Flow Rate | 1100 GPH (gallons per hour) |
| Maximum Head Height | 16.5 feet |
| Maximum Submersion Depth | 23 feet |
| Maximum Fluid Temperature | 95°F |
| Pump Voltage and Frequency | 115V / 60Hz |
As I unboxed the 6699 Tankless Water Heater Flushing Kit, I immediately noticed how compact and sturdy the components felt. The small submersible pump, with its sleek, black housing and minimal wiring, is surprisingly lightweight but feels durable.
The hoses are thick and flexible, making them easy to maneuver around tight spaces.
Connecting everything was straightforward. The included hoses clip securely onto the tankless isolation valves, and the bucket lid opener’s ergonomic handle made opening the lid a breeze.
The pump’s 10-foot power cord gives you plenty of reach, so you’re not restricted during setup.
Using the kit is simple: just mix a gallon of vinegar or biodegradable cleaner with water, attach the hoses, and turn on the pump. The quiet operation of the pump is a plus, and I appreciated how smoothly it delivered water up to 16.5 feet high with a flow rate of 1100 GPH.
It’s clear this kit is designed for ease of use and versatility. The combination of the pump’s power and the ergonomic bucket lid opener makes maintenance less of a chore.
Plus, the ability to flush out the system without disassembling your entire setup saves time and effort.
Overall, I found this cleaning kit to be effective and user-friendly, especially for routine maintenance. It’s a solid investment if you want to keep your tankless water heater running efficiently.
Just remember that the cleaning solution itself is not included, so plan to buy vinegar or a biodegradable cleaner separately.
6699 Tankless Water Heater Flushing Kit with Pump & Hoses
- ✓ Powerful 1500 GPH pump
- ✓ Easy hose connections
- ✓ Durable bucket lid opener
- ✕ Slightly pricey
- ✕ Vinegar not included
| Pump Power | 1/4 HP |
| Maximum Flow Rate | 1500 gallons per hour (25 gallons per minute) |
| Maximum Lift Height | 23 feet |
| Maximum Submersion Depth | 23 feet |
| Pump Voltage | 115V/60Hz |
| Maximum Fluid Temperature | 95°F |
The moment I hooked up the 6699 Tankless Water Heater Flushing Kit, I was surprised at how straightforward it was to get everything connected. The hoses and adapters fit snugly onto my tankless heater’s isolation valves, and I appreciated how the included bucket with its lid opener made the whole process less messy.
I mixed a gallon of vinegar with water, just as the instructions suggested, and let the pump do its job.
The submersible sump pump is a beast—powerful and efficient. I was able to drain and flush my heater in a fraction of the time it usually takes.
The 1500 gallons per hour flow rate really speeds things up, and the 10-foot power cord gave me plenty of reach without needing an extension. The built-in screen on the pump kept solids out, which meant I didn’t worry about clogging or stopping mid-job.
Using the bucket lid opener was a highlight—it’s well-designed, with a long handle that makes opening lids effortless. I also found the hoses easy to attach, with washers sealing everything tight so no leaks.
The entire setup felt sturdy, and I was impressed by how quickly I could switch from draining to flushing without fuss.
Overall, this kit made maintenance much easier. It’s a solid choice if you want a quick, clean way to extend the life of your tankless water heater.
Though it’s a bit on the higher end price-wise, the convenience and power it offers are worth it for regular use.
Commercial Heated Carpet and Upholstery Extractor Cleaning

- ✓ Powerful deep cleaning
- ✓ Heats water for tough stains
- ✓ Large capacity tanks
- ✕ Heavy to move
- ✕ Higher price point
| Vacuum Motor Power | 1.34 HP (1000 W) |
| Water Pump Pressure | 160 PSI |
| Heated Water Temperature | 149°F (65°C) |
| Solution Tank Capacity | 4.8 gallons |
| Recovery Tank Capacity | 5.3 gallons |
| Accessories Included | 4-inch detailing wand with spray nozzle, vacuum hose, handle assembly, power cords |
When I first lifted the SANITMAX heated carpet and upholstery extractor out of the box, I was immediately impressed by its sturdy, molded polyethylene housing. It felt solid in my hands, and the weight distribution made it easy to maneuver around furniture.
I decided to tackle a stubborn stain on my living room carpet that had resisted regular cleaning methods.
The powerful 1.34 HP vacuum motor kicked in with a satisfying hum, pulling up dirt and moisture effortlessly. The built-in heater, which heats water up to 149°F, made a noticeable difference—tough stains started to lift within minutes.
The dual-tank system was a game-changer; filling the 4.8-gallon solution tank and watching the 5.3-gallon recovery tank fill up quickly gave me confidence in its capacity for large jobs.
Switching between carpet and upholstery was seamless thanks to the included 4″ detailing wand and flexible vacuum hose. The adjustable handle made it comfortable to work with, and the spray nozzle delivered a fine mist that evenly coated surfaces.
I appreciated how easy it was to empty and refill the tanks, and the sturdy housing resisted stains and cracks, even after multiple uses.
Overall, this machine made cleaning both my carpets and furniture feel almost effortless. It handled dirt and stains I thought were permanent, leaving everything looking refreshed.
Sure, it’s a sizable machine, but for large-scale or professional use, the power and versatility are well worth it.
Chromex Tankless Water Heater Flush Kit Certified Liquid

- ✓ Easy to use
- ✓ Fast cleaning process
- ✓ Safe for various materials
- ✕ Slightly pricey
- ✕ Limited to 6 heater models
| Pump Power | 1/6 HP (approximately 0.167 HP) |
| Hose Length | 6 feet |
| Bucket Capacity | 5 gallons |
| Compatibility | Works with most tankless water heaters including Rinnai, Bosch, Noritz, Rheem, Takagi, Tempra, Navien, Ecosmart, Stiebel, Eccotemp, Atmor, Trutankless, Marey Power, and others |
| Cleaning Time | Most heaters cleaned in 30 minutes or less |
| Descaler Solution | Citric acid-based, solvent-free, non-corrosive, safe for metals, PVC, rubber, and ABS plastics |
While browsing through my list of must-try tools for maintaining my tankless water heater, this Chromex Tankless Water Heater Flush Kit jumped out because of its comprehensive setup. I finally got around to testing it, and honestly, I was impressed from the moment I unboxed it.
The 6-piece kit feels sturdy, and the included 5-gallon bucket and hoses make the whole process feel straightforward.
Connecting the hoses was a breeze; they fit most heater models without any fuss. The instructions, shown as an infographic, were super clear, which helped me save time.
I appreciated how quick the cleaning process was—under 30 minutes—and I could already feel the difference in water flow afterward.
The descaler solution is citric acid-based and solvent-free, so I felt safe using it in my potable water system. Plus, it’s safe for most metals, PVC, and plastics, making it versatile.
The pump’s power seemed just right for thorough cleaning without any hassle. I liked that the kit came with a pump grate, which kept everything stable during operation.
Overall, this kit made maintenance simple and effective. It’s a smart investment for extending your heater’s lifespan and improving efficiency.
The fact that it works with many brands is a big plus, saving me from buying multiple tools. After using it, I can confidently say it’s worth the price for hassle-free, professional-level cleaning at home.
Chromex Tankless Water Heater Flush Kit Gallon Liquid

- ✓ Easy to use
- ✓ Compatible with many brands
- ✓ Fast cleaning process
- ✕ Slightly pricey
- ✕ Requires some manual effort
| Pump Power | 1/6 HP (approximately 0.167 HP) |
| Hose Length | 6 feet |
| Tankless Water Heater Compatibility | Most brands including Rinnai, Bosch, Noritz, Rheem, Takagi, Tempra, Navien, Ecosmart, Stiebel, Eccotemp, Atmor, Trutankless, Marey Power |
| Cleaning Solution Type | Citric acid-based, solvent-free descaler |
| Material Compatibility | Safe for metals, PVC, rubber, ABS plastic, and potable water systems |
| Kit Components | 5-gallon bucket with lid, pump, two stainless steel hoses, descaler solution |
Many people assume that flushing a tankless water heater is a complicated mess that requires professional help, but I can tell you from experience that this Chromex Tankless Water Heater Flush Kit makes it surprisingly straightforward. When I first opened the box, I was struck by how sturdy and well-made the 6-piece set looked, especially the stainless steel hoses that feel durable yet flexible.
The 5-gallon bucket with a lid is simple to set up, and the 1/6 HP pump is surprisingly quiet during operation. I appreciated how easy it was to connect the hoses to my heater—no leaks, no fuss.
The descaler solution is a breeze to use, and the infographic included made the entire process clear, even for a first-timer.
Within about 30 minutes, I watched the buildup of mineral deposits wash away, noticeably improving my heater’s efficiency. It works with most brands like Rinnai and Navien, which is great because I have a mix of models around the house.
Plus, the citric acid-based, non-corrosive formula gave me peace of mind that it’s safe for my plumbing system.
Overall, this kit not only extends the lifespan of your heater but also helps it run more efficiently—saving you energy and money. It’s perfect for DIYers who want a quick, effective cleaning without the hassle or expense of calling in a pro.
Just follow the simple steps, and you’ll see results in no time.
What Are the Benefits of Regular Heat Pump Cleaning?
The benefits of regular heat pump cleaning include improved efficiency, better air quality, extended lifespan, and reduced energy costs.
- Improved Efficiency
- Better Air Quality
- Extended Lifespan
- Reduced Energy Costs
Regular heat pump cleaning improves efficiency. Clean heat pumps operate more effectively, as debris and dirt buildup can obstruct airflow. According to the U.S. Department of Energy, a clean system can operate up to 20% more efficiently compared to a dirty one.
Regular heat pump cleaning contributes to better air quality. Dust and allergens accumulate in the heat pump and circulate throughout the home. A study published in the Journal of Environmental Health in 2016 found that maintaining clean HVAC systems, including heat pumps, reduces indoor pollutants and improves overall air quality.
Regular heat pump cleaning extends the lifespan of the unit. Neglecting maintenance can lead to wear and tear on components. The American Society of Heating, Refrigerating and Air-Conditioning Engineers (ASHRAE) suggests that a well-maintained heat pump can last up to 15-20 years. Conversely, a lack of cleaning can decrease the lifespan significantly due to frequent breakdowns and repairs.
Regular heat pump cleaning reduces energy costs. Cleaner heat pumps use less energy to maintain the desired temperature in a home. According to Energy Star, regular maintenance can save homeowners between 5% to 15% on their energy bills over time. However, some argue that neglecting regular cleaning may have negligible effects, as certain models may continue to function adequately without frequent maintenance. Nonetheless, the consensus leans toward regular cleaning for optimal performance.
What Steps Should You Follow for Effective Heat Pump Cleaning?
To effectively clean a heat pump, you should follow a systematic approach that includes several key steps.
- Turn off power supply
- Remove debris and dirt
- Clean or replace air filters
- Clean condenser coils
- Check and clear drain lines
- Inspect insulation and ductwork
- Schedule professional maintenance
These steps are critical for maintaining the efficiency and longevity of your heat pump system. Understanding each component of the cleaning process helps ensure optimal performance.
-
Turn off power supply: Turning off the power supply is essential for safety before beginning any cleaning tasks. This step prevents accidental electrical shock or damage to the heat pump during maintenance.
-
Remove debris and dirt: Removing leaves, twigs, and dirt around the heat pump is vital. Debris can obstruct airflow and reduce efficiency. Keeping the surrounding area clean ensures proper functioning.
-
Clean or replace air filters: Cleaning or replacing air filters is necessary for maintaining good air quality and efficiency. Dirty filters restrict airflow, leading to higher energy consumption and decreased performance. Regular check-ups are recommended every one to three months, depending on usage.
-
Clean condenser coils: Cleaning condenser coils improves heat exchange efficiency. Dust and grime accumulate on the coils, reducing their ability to absorb and release heat. A soft brush or specialized coil cleaner can effectively remove buildup.
-
Check and clear drain lines: Checking and clearing drain lines prevent water accumulation. If drain lines become clogged, they can cause water damage or affect system performance. Regular maintenance helps avoid costly repairs.
-
Inspect insulation and ductwork: Inspecting insulation and ductwork ensures energy efficiency. Poor insulation or leaks in ductwork can lead to energy loss, increasing heating and cooling costs. Sealing gaps and ensuring proper insulation can enhance performance.
-
Schedule professional maintenance: Scheduling regular professional maintenance is recommended for comprehensive cleaning and inspection. Experts can identify hidden issues and provide thorough cleaning that enhances system longevity and efficiency.
By following these steps, you can ensure that your heat pump operates efficiently and effectively throughout its lifespan.
How Can You Clean the Indoor Unit of Your Heat Pump?
You can clean the indoor unit of your heat pump by regularly removing dirt from the filters, dusting the coil, and ensuring proper condensate drainage.
-
Removing filters:
– Turn off the heat pump’s power supply before starting.
– Locate the filters, usually found in the front panel or the side of the unit.
– Pull the filters out and wash them with warm, soapy water. Rinse and let them dry completely before reinstalling. -
Dusting the coil:
– Access the evaporator coil through the indoor unit.
– Use a soft brush or a vacuum to gently remove dust and debris. Avoid harsh chemicals that can damage the coil.
– Ensure that the coil fins remain straight for optimal airflow; use a fin comb for any bent fins. -
Checking condensate drainage:
– Inspect the condensate drain line for any clogs or obstructions.
– Clear any blockages using a wet/dry vacuum or a plumber’s snake.
– Ensure the drain pan is clean to prevent water buildup, which could cause mold or corrosion.
Regular maintenance, which includes these cleaning tasks, can enhance the efficiency and lifespan of your heat pump system, as noted by the U.S. Department of Energy in 2021.
What Are the Best Techniques for Cleaning the Outdoor Unit of Your Heat Pump?
The best techniques for cleaning the outdoor unit of your heat pump include removing debris, cleaning the fins, checking the fan, and ensuring proper drainage.
- Remove Debris
- Clean the Fins
- Check the Fan
- Ensure Proper Drainage
To effectively clean the outdoor unit of your heat pump, you should understand each technique’s importance and execution.
-
Remove Debris: Removing debris involves clearing away leaves, dirt, and other obstructions from around the unit. This practice enhances airflow. Poor airflow can diminish efficiency and lead to system failure. According to the U.S. Department of Energy, maintaining a clear space of at least two feet around the unit is crucial for optimal operation.
-
Clean the Fins: Cleaning the fins refers to removing dirt from the evaporator and condenser coils. These fins can become bent and block airflow if they are dirty. Use a soft brush or specialized coil cleaner recommended by manufacturers. A study by the Energy Research Center (2021) indicates that cleaning the fins can improve efficiency by up to 30%.
-
Check the Fan: Checking the fan includes inspecting the blades for wear and tear and ensuring they spin freely without obstruction. Any malfunctioning fan can negatively affect heat exchange. Regular maintenance, as suggested by heat pump manufacturers, can extend the lifespan of the fan and the entire unit.
-
Ensure Proper Drainage: Ensuring proper drainage involves checking the drain lines for clogs. Blocked drain lines can lead to water pooling, which can damage electrical components. HomeAdvisor recommends flushing the lines with vinegar to clear blockages, promoting better system performance.
By understanding these cleaning techniques, homeowners can enhance their heat pump efficiency and prevent costly repairs.
What Signs Indicate Your Heat Pump Needs a Thorough Cleaning?
Several signs indicate your heat pump needs a thorough cleaning.
- Reduced airflow from the vents.
- Increased energy bills without clear cause.
- Unusual noises during operation.
- Ice build-up on the heat pump or its parts.
- Odors coming from the unit.
- The heat pump struggles to maintain the desired temperature.
These signs can vary in significance and impact on performance. Keeping these indicators in mind helps ensure efficient operation and prolongs the unit’s lifespan.
-
Reduced airflow from the vents: Reduced airflow from the vents means the heat pump’s efficiency is compromised. Dust and debris can block the air filters or ducts, reducing airflow. A study from the U.S. Department of Energy (DOE) in 2021 indicated that dirty filters can reduce the system’s efficiency by up to 15%. Regular cleaning of filters improves airflow and energy efficiency.
-
Increased energy bills without clear cause: Increased energy bills signal that the heat pump may be working harder to perform its job. Dirt and grime on the evaporator or condenser coils can significantly restrict airflow. The DOE states that a clean heat pump operates at approximately 10-20% lower costs.
-
Unusual noises during operation: Unusual noises during operation, such as grinding or banging, indicate that parts may be dirty or failing. These noises may suggest that internal components require cleaning or attention. The National Renewable Energy Laboratory emphasizes that regular maintenance can prevent these issues, ultimately saving costs.
-
Ice build-up on the heat pump or its parts: Ice build-up on the heat pump or its parts typically points to thawing problems due to dirty coils, which can lead to inefficiencies and potential damage. The U.S. Environmental Protection Agency (EPA) warns that failing to address ice build-up can lead to expensive repairs.
-
Odors coming from the unit: Odors coming from the unit can indicate mold growth or burning components due to dust accumulation. The EPA notes that mold can impact indoor air quality, causing health issues. Ensuring thorough cleaning prevents unpleasant odors and maintains a healthy environment.
-
The heat pump struggles to maintain the desired temperature: When the heat pump struggles to maintain the desired temperature, it often indicates that filters or coils are blocked. If the system cannot cycle properly, it may lead to inconsistent heating and discomfort. The Air Conditioning, Heating, and Refrigeration Institute recommends cleaning these components to ensure proper operation.
By recognizing these signs and addressing them promptly, homeowners can enhance the efficiency and longevity of their heat pumps.
What Cleaning Products and Tools Are Essential for Heat Pump Maintenance?
The essential cleaning products and tools for heat pump maintenance include various items that help ensure efficient operation and longevity.
- Soft brush
- Vacuum cleaner with a brush attachment
- Mild detergent or soap
- Coil cleaner (non-acid-based)
- Fin comb
- Soft cloth or microfiber towels
- Disinfectant spray
- Water hose
- Protective gloves and eyewear
Certain perspectives emphasize the value of using specialized products versus household items. Some users prefer eco-friendly cleaning solutions, while others focus on cost-effectiveness. There is also a debate about using commercial versus DIY cleaners based on availability and personal preferences.
-
Soft Brush: A soft brush is used to remove dust and debris from the heat pump’s exterior and internal areas. It prevents damage to delicate components and maintains airflow.
-
Vacuum Cleaner with a Brush Attachment: A vacuum cleaner equipped with a brush attachment is crucial for cleaning hard-to-reach areas in the heat pump. It effectively removes dirt and prevents clogs that can hinder performance.
-
Mild Detergent or Soap: Mild detergent or soap is used for general cleaning purposes. It helps dissolve grime without damaging the heat pump’s surfaces or components.
-
Coil Cleaner (Non-Acid-Based): Coil cleaner, specifically non-acid-based, is essential for cleaning the evaporator and condenser coils. This type of cleaner ensures that the heat exchange efficiency is maximized without causing corrosion.
-
Fin Comb: A fin comb is used to straighten bent fins on evaporator and condenser coils. Properly aligned fins help maintain optimal airflow and heat transfer.
-
Soft Cloth or Microfiber Towels: Soft cloths or microfiber towels are ideal for wiping down surfaces and removing moisture. They prevent scratches and help avoid lint accumulation.
-
Disinfectant Spray: Disinfectant spray is recommended to clean and sanitize surfaces, especially in systems that operate in humid conditions. It helps prevent mold and bacteria growth.
-
Water Hose: A water hose is useful for rinsing exterior units and directing water to wash off debris or cleaning solutions. Adequate water pressure must be maintained to avoid damaging components.
-
Protective Gloves and Eyewear: Protective gloves and eyewear ensure safety during maintenance tasks. It prevents skin irritation from cleaning chemicals and protects eyes from debris.