
Many users assume that a DIY pool kit just means some parts thrown together, but my hands-on experience shows otherwise. After testing several options, I found that the right kit can make setup quick and maintenance effortless—something worth knowing if you want hassle-free swimming all summer. The key is in the details: sturdy construction, easy assembly, and helpful accessories really matter.
Take the WaterThat Steel Frame Above-Ground Pool Kit 15′ x 52 — it offers durable galvanized walls, a solid liner, and a convenient skimmer for low-maintenance cleaning. But for pure convenience and a quick start, I recommend the Stock Tank Pool DIY Starter Kit (No Filter Pump). It features innovative threaded fittings, an easy setup that takes under an hour, and clever accessories like a floating chlorine dispenser and thermometer—making it a true standout in value and usability.
Top Recommendation: Stock Tank Pool DIY Starter Kit (No Filter Pump)
Why We Recommend It: This kit excels with its super-smart threaded fittings for simple setup, eliminating the need for plumbing skills. It also includes innovative features like interchangeable filter caps and vacuum adapters, plus accessories such as a float and thermometer. Compared to the Steel Frame Pool, which offers durability but requires more assembly and separate filter purchases, the Stock Tank Pool kit delivers immediate ease and effective maintenance right out of the box.
Best diy pool kit: Our Top 2 Picks
- Stock Tank Pool DIY Starter Kit (No Filter Pump) – Best beginner pool kit
- WaterThat Steel Frame Above-Ground Pool Kit 15′ x 52 – Best all-in-one pool kit
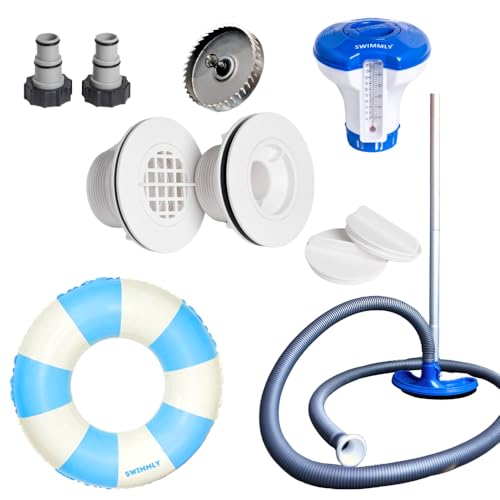
Stock Tank Pool DIY Starter Kit (No Filter Pump)
- ✓ Easy, no-sweat setup
- ✓ Sparkling clean results
- ✓ Innovative connector fittings
- ✕ Manual cleaning needed
- ✕ Limited size capacity
| Tank Material | Heavy-duty galvanized steel or polyethylene (typical for stock tanks) |
| Tank Capacity | Approximately 1000 to 3000 gallons (based on common stock tank sizes) |
| Fitting Compatibility | Standard threaded fittings for easy connection of hoses and accessories |
| Included Accessories | Inflatable pool ring, floating chlorine dispenser, thermometer, hole saw |
| Vacuum System | Integrated vacuum hose adapter with quick-connect fittings |
| Filter System | No built-in filter pump; relies on manual or external filtration methods |
The first thing that struck me about this Stock Tank Pool DIY Starter Kit was how straightforward the setup was. I remember unboxing it and thinking, “Wow, these threaded fittings are actually clever.” No complicated instructions—just screw, connect, and you’re almost ready to splash around.
Within less than an hour, I had the entire pool filled, the vacuum running, and the chlorinator floating. The innovative fittings really do make hooking up the vacuum and filter a snap—no fuss, no tools needed.
It’s a huge relief not to wrestle with clunky parts or worry about leaks.
The vacuum system impressed me. It cleaned the bottom way better than I expected, leaving the pool looking sparkling and inviting.
Plus, the included thermometer and floating chlorinator made managing chemical levels and temperature easy, so I could keep everything just right without extra gadgets.
Adding the inflatable ring was a fun touch, and I loved that the hole saw made prepping the tank simple—no guesswork involved. The interchangeable fittings, especially the filter changing caps, are a game-changer.
It feels like a professional setup, but totally DIY friendly.
Of course, without a filter pump, you’ll need to manually clean and maintain the water, which is a minor inconvenience. Also, the setup is great for small to medium tanks, but if you’re dreaming of a huge backyard pool, this might be a bit limiting.
Overall, this kit makes owning a personal pool accessible and enjoyable. It’s perfect for spontaneous summer days and surprisingly easy to keep clean and fun to use.
WaterThat Steel Frame Above-Ground Pool Kit 15′ x 52

- ✓ Easy to assemble
- ✓ Durable galvanized steel
- ✓ Includes skimmer and net
- ✕ Slightly pricey
- ✕ Takes time to install
| Frame Material | Galvanized steel with corrosion-resistant coating |
| Pool Diameter | 15 feet |
| Pool Wall Thickness | 20 gauge vinyl liner |
| Pool Wall Construction | Steel top rails with vertical galvanized walls |
| Filter Pump Power | Typically 0.5 to 1.0 horsepower (standard for above-ground pools) |
| Liner Dimensions | Approximately 15 feet diameter with 52 inches height |
Many folks assume that setting up an above-ground pool is a messy, complicated chore that takes a weekend and a sore back to finish. I’ve found that’s not entirely true, especially with the WaterThat Steel Frame Above-Ground Pool Kit.
From the moment I unpacked it, I noticed how neatly everything was organized, making the assembly process surprisingly straightforward.
The steel top rails and galvanized walls feel solid right out of the box. During setup, I appreciated how the vertical pillars snapped into place with minimal fuss, thanks to clear instructions.
The 15′ x 52″ size is perfect for family fun without feeling overwhelming to install or manage. The included sand filter pump (though you need to buy sand separately) kept the water crystal clear after just a few hours of use.
The vinyl liner is thick enough to feel durable yet flexible enough to install easily. I liked that it’s UV protected, so I don’t have to worry about fading after a few summers.
The skimmer and net make cleaning a breeze—less time fishing debris out and more time swimming.
Of course, the price is on the higher side, but considering all the quality components, it feels like a solid investment. The only downside I noticed is that the assembly takes some time, especially if you’re new to DIY projects.
Still, the instructions are clear, and the end result is a sturdy, attractive pool that’s ready for summer.
What Is a DIY Pool Kit and Why Should You Consider It?
A DIY pool kit is a collection of materials and components necessary for individuals to construct their own swimming pool at home. These kits typically include items such as pool walls, liners, plumbing, and pumps, allowing homeowners to create a customized swimming experience.
The American Pool and Spa Association defines a DIY pool kit as a “cost-effective solution for those looking to build a pool without hiring a contractor.” This definition highlights the potential savings and personal involvement in the building process.
DIY pool kits offer various benefits. They provide flexibility in design, allow for personal customization, and can significantly reduce labor costs. Additionally, homeowners gain the satisfaction of completing a project themselves.
According to an article from Pool & Spa Warehouse, DIY pool kits can range from above-ground structures to inground options, catering to various preferences and budgets. These kits may include assembly instructions and customer support to assist builders.
Several factors contribute to the growing popularity of DIY pool kits. Increased interest in home improvement projects and a desire for private leisure spaces drive homeowners to consider this option.
Research from MarketWatch indicates a projected growth in the DIY pool market, with an expected increase of 8.5% annually through 2027. The demand for home amenities and leisure spaces continues to rise post-pandemic.
The societal impacts of DIY pool kits include improved access to recreational activities and enhancing property value. Additionally, they promote family bonding through collaborative building projects.
On a broader scale, DIY pool kits impact health by encouraging physical activity and outdoor recreation. Environmentally, they can introduce challenges concerning water usage and chemical management in pools.
Specific examples of the societal benefits include increased backyard gatherings and improved mental well-being through leisure activities.
To address potential issues, experts recommend proper planning, adherence to local regulations, and environmental considerations. Proper site assessment and sustainable landscaping practices can also mitigate impacts.
Strategies to ensure successful DIY pool construction include utilizing energy-efficient equipment, implementing green building practices, and seeking guidance from pool installation professionals when needed. These measures promote responsible pool ownership and sustainable practices.
How Do Inground, Above Ground, and Semi-Inground Pool Kits Differ?
Inground, above ground, and semi-inground pool kits differ primarily in installation method, structural design, and cost. Each type has unique features that cater to different preferences and budgets.
Inground pool kits:
– Installation: Inground pools require excavation of the yard. Contractors prepare the site and install the pool structure below ground level.
– Structural design: These pools typically consist of concrete, fiberglass, or vinyl-lined materials. They offer a permanent solution and can shape to various designs and sizes.
– Cost: Inground pools are generally the most expensive option. Costs can range from $25,000 to over $50,000, depending on materials and features (Pool & Spa, 2022).
Above ground pool kits:
– Installation: Above ground pools sit on the surface and typically require less extensive site preparation. Homeowners can often install these themselves.
– Structural design: They are usually made from metal or resin walls, filled with pool liners. These pools come in round or oval shapes, and the designs are generally less customized than inground options.
– Cost: Above ground pools are the most budget-friendly option. Prices range from $1,500 to $6,000, making them accessible for various budgets (The Spruce, 2023).
Semi-inground pool kits:
– Installation: Semi-inground pools combine aspects of both inground and above ground pools. They require partial embedding in the ground, which offers a middle ground in terms of installation effort.
– Structural design: These pools can use similar materials as inground pools but are available in various shapes and heights. They offer more design flexibility than above ground pools.
– Cost: Semi-inground pools typically range from $3,000 to $15,000. They provide a balance between the low cost of above ground pools and the aesthetic appeal of inground options (HomeAdvisor, 2023).
These differences can significantly influence your decision when selecting a pool kit based on your needs, preferences, and budget.
What Key Features Should You Look for When Choosing a DIY Pool Kit?
When choosing a DIY pool kit, look for key features such as material quality, type of pool, installation ease, size options, and maintenance needs.
Key Features to Consider:
1. Material quality
2. Type of pool (above-ground or in-ground)
3. Installation ease
4. Size options
5. Maintenance requirements
The list of features encompasses a variety of perspectives and realities for potential pool kit buyers.
-
Material Quality:
Material quality determines the durability and longevity of the pool. DIY pool kits commonly use materials such as steel, resin, or polymer. Steel kits offer strength but may rust, while resin kits resist weathering. According to a 2021 survey by Pool & Spa Australia, 40% of DIY pool owners reported that material quality significantly affected their satisfaction. -
Type of Pool:
Choosing between an above-ground or in-ground pool impacts budget and installation. Above-ground pools are generally more affordable and easier to install. In-ground pools offer better aesthetics and customization but involve more extensive installation and higher costs. A report by the Association of Pool and Spa Professionals (APSP) states that in-ground pools can increase property value, which some homeowners find appealing. -
Installation Ease:
The complexity of installation varies by kit. Some pools require extensive digging and reinforcement, while others are straightforward and can be assembled with basic tools. For instance, above-ground kits often include straightforward instructions, and some companies offer video tutorials. The market trend indicates a growing preference for kits designed for easier installation, particularly among less experienced homeowners. -
Size Options:
Size options should meet your space availability and usage needs. Popular pool sizes typically range from 12 to 36 feet in diameter for above-ground pools. For in-ground pools, options are more customizable but may be limited by space and local regulations. Market data suggest that larger pools are favored for larger families or entertainment purposes. -
Maintenance Requirements:
Maintenance needs differ based on the pool type and materials used. Above-ground pools may require less maintenance compared to in-ground pools, which often necessitate regular upkeep due to pumps, filters, and heating systems. In a study by the National Association of Realtors (NAR), 30% of homeowners reported maintenance as a critical factor when selecting a pool type.
Understanding each feature helps consumers make informed decisions that suit their lifestyle, budget, and long-term goals.
How Important Is Installation Ease in Selecting a DIY Pool Kit?
Installation ease is very important when selecting a DIY pool kit. A simple installation process reduces frustration. It saves time and costs associated with hiring professionals. DIY pool kits with clear instructions facilitate the setup. They often include all necessary components for assembly. Homeowners can follow step-by-step guides to ensure proper installation.
Easy-to-install kits enhance the overall DIY experience. They allow users to focus on enjoyment rather than complications. Pools that require minimal technical skills are more accessible. These kits often feature pre-cut materials and intuitive designs. Their user-friendliness encourages more people to undertake the project.
Overall, the importance of installation ease lies in its ability to make pool ownership attainable for everyone. Ease of installation directly impacts satisfaction and the likelihood of success in creating a backyard oasis.
What Are the Main Benefits of Using a DIY Pool Kit?
The main benefits of using a DIY pool kit include cost savings, customization options, and flexibility in installation.
- Cost Savings
- Customization Options
- Flexibility in Installation
- Skill Development
- Control Over Materials
- Satisfaction and Achievement
Using a DIY pool kit provides many appealing advantages.
-
Cost Savings: The benefit of cost savings comes from the reduced labor costs when homeowners choose to install the pool themselves. Saving on contractor fees can lower the overall project cost significantly.
-
Customization Options: DIY pool kits offer various designs and sizes. Homeowners can choose the shape, depth, and features of their pool, tailoring it to their preferences and yard layout.
-
Flexibility in Installation: DIY pool kits allow individuals to set their timelines. homeowners can schedule the installation around other tasks or personal schedules without the constraints of a professional’s availability.
-
Skill Development: Working with a DIY pool kit can enhance practical skills. Homeowners learn about construction, plumbing, and electrical systems, which may be beneficial for future home improvement projects.
-
Control Over Materials: With a DIY pool kit, homeowners have the ability to choose their materials. They can select quality options that fit their budget and style, allowing for personal expression.
-
Satisfaction and Achievement: Completing a DIY project offers a sense of accomplishment. Homeowners feel proud to have built their own pool, which can enhance overall enjoyment and bonding with family and friends.
How Can You Successfully Install a DIY Pool Kit Step-by-Step?
Installing a DIY pool kit successfully involves careful planning, proper equipment preparation, and meticulous execution of the assembly process. Here are step-by-step details for installation:
-
Choose the location.
– Select a flat, level area in your yard for the pool. Ensure it has adequate sun exposure and distance from trees, structures, or utility lines. -
Gather your materials.
– Obtain the pool kit, which usually includes wall panels, a liner, coping, filter system, skimmer, and pump. Ensure all equipment is in good condition before starting. -
Prepare the site.
– Clear the chosen location of grass, rocks, and debris. Use a shovel or landscaping equipment to level the ground. A sub-base of sand can provide a smooth and stable surface. -
Assemble the wall panels.
– Follow the manufacturer’s instructions to connect the wall panels. This usually involves standing the panels upright and securing them with bolts and brackets. Check for alignment and levelness throughout this process. -
Install the bottom track.
– Place a bottom track around the perimeter of the pool. This stabilizes the wall panels and provides a framework for the pool liner. -
Add the pool liner.
– Unwrap and lay the pool liner in the bottom of the pool structure. Ensure there are no wrinkles. A hose can be used to fill the pool slightly while adjusting the liner for a perfect fit. -
Install the coping and top rails.
– Attach the coping along the edge of the pool to secure the liner in place. Then, fasten the top rails, which provide structural support. Ensure everything is tight and properly aligned. -
Set up the filtration system.
– Position the pump and filter according to the provided guidelines. Connect all plumbing fixtures, skimmers, and return lines needed for water circulation. -
Fill the pool with water.
– Begin filling the pool with water using a garden hose. Monitor the liner as the water rises, ensuring it remains smooth and fits correctly. -
Perform final checks and maintenance.
– Once the pool is filled, inspect all connections for leaks. Turn on the filtration system and test the water chemistry. Adjust chemical levels as needed for safe swimming.
These steps provide a clear and organized approach to installing a DIY pool kit. Following each step carefully will lead to successful installation.
What Tools and Materials Are Essential for the Installation?
The essential tools and materials for installation depend on the specific project but typically include a range of equipment and supplies necessary for proper execution.
-
Basic Tools:
– Hammer
– Screwdriver set
– Wrench set
– Pliers
– Level
– Measuring tape
– Utility knife
– Drill and drill bits -
Safety Equipment:
– Safety goggles
– Gloves
– Dust mask
– Hard hat -
Installation Materials:
– Screws
– Nails
– Anchors
– Adhesives
– Sealants
– Insulation -
Specialized Tools (Project specific):
– Saw (hand or power)
– Sledgehammer
– Pipe cutter
– Trowel -
Support Equipment:
– Ladder
– Scaffolding
– Tarps for protection
Various projects may require different combinations of the above tools and materials. Choosing the right tools can affect the efficiency and quality of the installation.
-
Basic Tools:
Basic tools are vital for any installation project. Hammers are used for driving nails. Screwdrivers help in tightening and loosening screws. Wrench sets are necessary for gripping, turning, and loosening nuts and bolts. Pliers assist with gripping and manipulating materials, while levels ensure precision in alignment. Measuring tapes are crucial for accurate measurements. Utility knives provide cuts needed for various materials, and drills are used for making holes and driving fasteners. -
Safety Equipment:
Safety equipment protects the installer from potential hazards. Safety goggles shield the eyes from dust and debris. Gloves prevent cuts and abrasions. Dust masks protect against inhaling harmful particles, and hard hats protect against head injuries in construction environments. -
Installation Materials:
Installation materials include essential components needed to complete the project. Screws, nails, and anchors are used to secure items in place. Adhesives and sealants provide bonding and sealing solutions. Insulation materials help regulate temperature and improve energy efficiency in installations, particularly in home construction. -
Specialized Tools (Project specific):
Specialized tools cater to specific tasks within an installation. Saws, both hand and power varieties, facilitate cutting wood or other materials. Sledgehammers are useful for demolition tasks. Pipe cutters allow for fast and clean cuts on plumbing pipes. Trowels are essential for applying and smoothing materials like cement or mortar. -
Support Equipment:
Support equipment aids the installer in accessing heights safely. Ladders provide access to elevated areas, while scaffolding creates stable platforms for larger construction tasks. Tarps protect surfaces and materials from weather or damage during installations.
Proper selection of tools and materials significantly impacts the success of any installation.
What Challenges Might You Encounter During Installation of a DIY Pool Kit and How Can You Overcome Them?
Installing a DIY pool kit can present several challenges. These challenges include site preparation, alignment issues, water quality management, and adherence to local regulations.
- Site Preparation Challenges
- Alignment Issues
- Water Quality Management
- Local Regulations Compliance
- Labor Intensity and Physical Demand
Site Preparation Challenges:
Site preparation challenges arise when the ground isn’t level or clear enough for the pool installation. The area must be excavated and leveled before installation. This requires careful planning and accurate measurements to avoid future issues. A comprehensive guide from IngroundPool.com emphasizes the importance of proper excavation and land grading prior to installation to ensure stability and longevity of the pool.
Alignment Issues:
Alignment issues can occur during the assembly of kit components, leading to structural inconsistencies. Each panel should be precisely aligned to prevent leaks and structural failure. According to AquaPro, misalignment remains a common problem for DIY installers, which can result from improper measurements or hasty installation. Using level tools and double-checking measurements can mitigate this issue.
Water Quality Management:
Water quality management becomes essential after pool installation. Safety and comfort rely on balanced water chemistry. It is recommended to regularly test and adjust pH, chlorine, and alkalinity. According to the CDC, poor water quality can lead to health issues, making it crucial for pool owners to monitor and maintain chemical balances continuously.
Local Regulations Compliance:
Local regulations compliance refers to following municipal or regional codes for pool installations. This ensures safety and environmental adherence. Homeowners can often overlook this critical aspect of DIY projects. The American Pool and Spa Association recommends contacting local authorities to understand necessary permits and regulations to avoid legal complications.
Labor Intensity and Physical Demand:
Labor intensity and physical demand refer to the physical work required to install the pool, which can be significant. DIY installation involves heavy lifting and extensive labor. A study by the National Association of Home Builders highlights that many homeowners underestimate the physical effort involved, which can lead to frustration and fatigue during the project. Ensuring access to adequate labor support and tools helps to address this challenge.